
Although current social media pages might be filled with so-called “glute girls” who prioritize their posterior in the gym, targeting your glutes and hamstrings isn’t just for likes and shares. A muscular backside also happens to be a key component in performing big feats of strength, as well as driving athletic performance in nearly any sport. While there…
The post 8 Hip Thrust Alternatives to Build Your Glutes and Hamstrings appeared first on Breaking Muscle.

Although current social media pages might be filled with so-called “glute girls” who prioritize their posterior in the gym, targeting your glutes and hamstrings isn’t just for likes and shares. A muscular backside also happens to be a key component in performing big feats of strength, as well as driving athletic performance in nearly any sport.
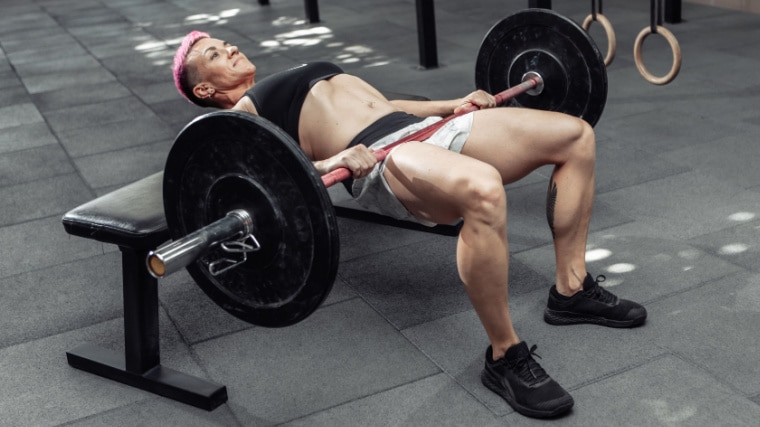
While there are plenty of potential exercises to target your posterior chain — lower back, glutes, and hamstrings — one of the most popular exercises in recent years is the barbell hip thrust.

This movement, supporting a weighted barbell across your hips while suspending your upper back on a platform, can be highly effective but it can also be awkward, physically uncomfortable, and difficult to master. To achieve the same end result (and the same result on your end), there are a few equally effective hip thrust alternatives that provide backside size and strength with fewer obstacles.
Best Hip Thrust Alternatives
- Sumo Deadlift
- Split-Stance Romanian Deadlift
- Walking Romanian Deadlift
- Kettlebell Swing
- Reverse Hyperextension
- SHELC
- Single-Leg Glute Bridge
- Single-Leg Landmine Hip Thrust
Sumo Deadlift
The conventional deadlift, with its hip-width stance and significant back involvement, is a staple for many lifters focused on muscle-building and strength gains. The sumo deadlift, however, uses a much wider stance to alter leverage and shift muscle recruitment.
The wide-set foot position increases leg drive, allowing the inner thighs (adductors), hamstrings, and glutes to be worked through a long range of motion, which can contribute to muscle growth. (1) The sumo deadlift also allows a more upright torso, which can reduce strain on the lower back, making the exercise ideal for anyone with recurring lower back pain or mobility issues.
When to Use It
As a “big ‘n basic” compound (multi-joint) movement, the sumo deadlift is a heavy hitter in the weight training world and should get top billing in a workout. Perform the exercise as early in the session as possible, as either the first or second exercise after a general warm-up.
Giving the exercise a high priority helps to reap the greatest strength and muscle gains, compared to performing it toward the end of the workout. (2)
How to Do It
Place a barbell on the floor and take a wider than shoulder-width stance. Angle your toes slightly outward and reach down with straight arms. Keep your upper body mostly vertical and bend your legs to grab the bar. Set your hands roughly hip-width apart. Take a breath and flex your abs to create tension.
Squeeze the bar tightly and pull your shoulder blades together. Drive your feet through the ground and apply constant tension to lift the weight — don’t try to abruptly yank the bar off the ground. Keep the bar close to your body as you lift up to full lockout. Reverse direction to replace the bar on the ground.
Split-Stance Romanian Deadlift
The Romanian deadlift is a commonly used deadlift variation to zero-in on the glutes and hamstrings. You can amp up that focus by adopting a split stance, or staggered stance, to emphasize each leg individually. Rather than a pure single-leg movement with your non-working leg entirely off the ground, you can maintain balance while also shifting the majority of muscular stress to the front leg.
Single-leg training, or using a single-leg emphasis, can be as beneficial as bilateral (two-legged) training when it comes to building muscle, strength, and power, while requiring relatively lower loads overall. (3) Getting comparable results with less weight can be especially beneficial for lifters dealing with joint pain.
When to Use It
Even though the split stance provides some balance support, it’s best not to perform the split-stance Romanian deadlift when extremely fatigued (at the end of a training session). Coordination, strength, and stability could be compromised which would make the exercise excessively challenging. Train the split-stance Romanian deadlift relatively earlier in the workout on a dedicated leg day, or as one of the only leg exercises performed in a full-body workout.
How to Do It
Stand upright, holding a barbell with an overhand grip. Take a small step back with your right leg, keeping the toes of your right foot generally in line with the heel of your left foot. Set your feet at least shoulder-width apart until you feel stable. Brace your core, keep your back neutral, and bend forward at your hips. Keep the bar close to your front leg.
Lower the weight until you feel a significant stretch in the hamstrings and glutes of your front leg. Raise the weight without moving your feet. Perform all reps on one side before switching your stance.
Walking Romanian Deadlift
The walking lunge has a well-earned reputation as an intense cardio exercise and a great leg-builder. Both of those benefits can be amplified by swapping the lunge for this deadlift variation. The walking Romanian deadlift cranks up the glute and hamstring activity without compromising any of the conditioning benefits.
When to Use It
The walking Romanian deadlift (or walking RDL) can be performed as an intense finisher at the very end of any workout, not just a leg session, or it can be performed on its own and programmed similar to a cardio/conditioning workout. Don’t feel like jumping on the treadmill? Grab a pair of dumbbells and do some walking RDLs. Rather than specific repetitions, the walking RDL can be performed for a duration (one or two minutes is a good start) or for a total distance (begin with 50 to 100 feet).
How to Do It
Stand with a dumbbell in each hand by your sides. Take a step forward with your left foot. When your foot is fully planted on the ground, slightly bend your left leg and hinge forward at your hips. Keep your back in neutral, not rounded.
Reach the weights toward your front foot as far as is comfortable. Pull your shoulders back to stand upright again. Take a step forward with your right foot. Repeat the hinge forward and reach down. Continue alternating feet with step forward.
Kettlebell Swing
The swing might be the most frequently performed kettlebell exercise because it delivers a great bang for the training buck. It allows you to build explosive power, top-notch conditioning and endurance, and a muscular posterior chain. If you have access to a kettlebell in your gym or at home, swings should be on the short list of “must-learn exercises.”
When to Use It
The kettlebell swing relies on explosive power, so it’s ideally performed early in a training session or in a workout by itself. If you’ve fine-tuned the technique and can control the movement, you may be able to use it as a finisher toward the end of a workout as long as your grip and lower back (two critical safety elements) aren’t pre-fatigued.
How to Do It
Stand in front of a kettlebell in a relatively wide stance. Hinge forward at your hips, push your glutes back, and grab the top handle with both hands in a palms-down grip. Forcefully drive your hips forward to lift the weight in a fast, powerful snap. Keep your arms mostly straight. Squeeze the handle tightly without actively using your arms to move the weight. Your arms are just for control, the force of movement should come from the initial hip drive.
Flex your core when the weight is at the top position (roughly chest level) and allow the kettlebell to reverse direction as it “falls.” Repeat the hinge with your upper body. As the kettlebell passes just behind your knees, snap your hips forward to begin the next repetition smoothly.
Reverse Hyperextension
If one exercise is repeatedly touted by veteran powerlifters as a way to build the lower back, glute, and hamstring strength needed to squat hundreds upon hundreds of pounds, it’s probably worth considering even for those not interested in lifting a half-ton. The reverse hyperextension has long been advocated in the strength sports world as a way to “injury-proof” the posterior chain.
That’s a large claim that depends on the individual and plenty of factors, but the reverse hyperextension has been shown to work your lower back, glutes, and hamstrings without needing to throw around heavy weights. (4) This makes it an ideal way to work the target muscles without wearing down your body.
When to Use It
This movement is an efficient way to wrap up any leg workout after your lower body is fatigued and fully warmed up. However, performing the reverse hyperextension with light weight for moderate to higher repetition can also be a good addition to your general warm-up routine. The muscle activation and significant stretch can help to prepare your posterior chain for any heavier work to follow.
How to Do It
Some commercial gyms have dedicated reverse hyperextension machines, but the exercise can be performed on a “standard” back hyperextension machine (while facing backwards, holding the leg pads with your hands) or using a exercise ball placed on top of a flat bench, but the ball will be unstable and will require much more core control.
Get into position with your hips and abdominals supported on the pad. Lean forward at your waist and allow your feet to hang freely in the air. Your upper and lower body should form a general L-shape. Contract your glutes to raise your straight legs until they’re roughly parallel to the ground. Pause at the top for one or two seconds. Lower your legs under control. Pause in the stretched position for one or two seconds before repeating.
SHELC
The supine hip extension leg curl, or SHELC, requires an exercise ball and some space to lie on the floor. It’s an efficient way to perform a hip thrust alternative at home with limited equipment. This bodyweight-only exercise is one of the few movements to significantly recruit your hamstrings nearly in isolation, without the help of your larger quadriceps muscles and without adding weight.
When to Use It
The SHELC is versatile enough to be performed at any point in a training routine. Because it’s a bodyweight movement, you may want to pre-fatigue your target muscles with exercises and use the SHELC to finish them or, if the exercise is sufficiently challenging for your legs, perform it earlier in the workout.
How to Do It
Lie on the floor with your legs extended and both heels on top of an exercise ball. Brace your upper body by keeping your arms on the ground. Dig your heels into the ball to raise your hips off the ground — your body should be in a straight line from your feet to your chest.
Curl your feet toward your glutes, pressing down to keep both feet in contact with the ball. Straighten your legs to return to the starting position. Don’t drop your hips until the entire set is completed — perform the leg curl while maintaining the bridged position. If your feet are close to falling off the ball when your legs are curled in, move your heels closer to the top/center of the ball in the starting position.
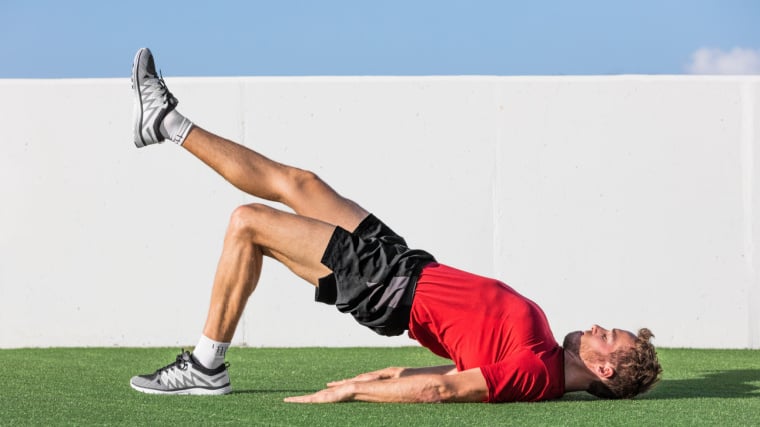
Single-Leg Glute Bridge
The glute bridge is very similar to the basic hip thrust, minus a bench to elevate your shoulders, so you can get the benefits of a hip thrust without equipment. The single-leg glute bridge can be an efficient exercise choice, especially because the basic (two-legged) glute bridge is often not challenging enough for many lifters.
When to Use It
The single-leg glute bridge only requires some space on the ground, so it can be very easily superset with nearly any exercise to sneak in extra glute and hamstring training at any time. Try pairing them with push-ups for a quick and simple, ground-based, bodyweight-only workout. Or perform a set of single-leg glute bridges before each set of deadlifts to boost glute activation.
How to Do It
Lie flat on the ground with your legs straight. Bend your left leg and place your foot on the ground near your right knee. Keep your right leg straight and raise it until your knees are next to each other. Hold this straight leg position for the duration of the set.
Keep your foot flat on the ground and drive through the floor while raising your hips. You should feel a strong contraction through the back of your left leg. Pause for one to two seconds before lowering your glutes to the floor. Perform all reps with one leg before switching sides.
Single-Leg Landmine Hip Thrust
One highly effective hip thrust alternative is actually a simple hip thrust variation. The landmine allows you to shift the load to a single hip, instead of bearing a long barbell across your entire hip area. This modified hip thrust can be more comfortable for the lifter, while the landmine’s pivoting base offers a unique training angle.
When to Use It
The single-leg landmine hip thrust can be programmed like any hip thrust movement, simply adjust the load as needed. Single-leg training is often overlooked in many training programs, so if your current leg workout doesn’t involve any unilateral movements, consider making the single-leg landmine hip thrust a key player.
How to Do It
Sit on the floor perpendicular to a flat bench with your legs extended straight. Position the end of a landmine above your left hip. Place your left foot flat on the ground near your right knee. Rest your upper back and arms across the bench.
Raise your hips by driving through the floor with your left foot. Brace your core and pivot your upper body around the bench. Pause briefly in the top position — when you’ve reached a straight line from your knees to your shoulders. Lower to the ground under control, being careful not to bounce the weight off the floor. Perform all reps with one leg before switching sides.
Benefits of Hip Thrust Alternatives
You’re not sacrificing results if you’ve opted out of the classic barbell hip thrust. In fact, there are a few specific reasons why a barbell hip thrust alternative could be the preferred choice as a barbell hip thrust replacement.
Avoids Hip Discomfort
Many lifters find the bar’s position during hip thrusts to be too uncomfortable and not worth the trouble. Because the hip thrust requires a barbell to be laid across your hip region, it’s not uncommon for your hip bones to come into contact with the weight, especially if the bar shifts or slides during repetitions. Even on specially designed hip thrust machines, the load is supported directly across your hips via a belt or pad, which can still cause extreme discomfort as the weight pulls down through your pelvis.
The majority of hip thrust alternatives don’t require weight to be loaded on your hips at all. The single-leg landmine hip thrust, in particular, supports the weight on a single side and the angle of the landmine helps to offset the stress.
Increased Muscle Recruitment
The barbell hip thrust can require some technique, between setting your upper body on the bench, positioning your feet correctly, and maintaining a neutral body position as your hips rise. Any errors in those steps can drastically reduce activation on the target muscles, making the exercise less effective.
These barbell hip thrust alternatives are relatively more simple to master, while targeting the glutes and hamstrings more directly either by using a single-leg emphasis or by reducing contributing muscles and working the target muscles in isolation.
Decreased Lower Back Stress
Some lifters feel lower back strain during the barbell hip thrust, as there can be some mobility requirements to safely and effectively perform the movement. Many of the alternative hip thrust exercises reduce compressive strain on the lower back and don’t require as much hip mobility to perform, which can make the exercises more joint-friendly.
More Ways to Work the Posterior
The hip thrust is a relatively popular exercise, but despite the hashtags, it’s not a mandatory movement for building a powerful, muscular set of glutes and hams. The effective alternatives laid out above can be plugged into any training plan whether your goal is lower body strength, total-body muscle, or the kind of glute and hamstring development that gets trending.
References
- Schoenfeld, B. J., & Grgic, J. (2020). Effects of range of motion on muscle development during resistance training interventions: A systematic review. SAGE open medicine, 8, 2050312120901559. https://doi.org/10.1177/2050312120901559
- Nunes, J. P., Grgic, J., Cunha, P. M., Ribeiro, A. S., Schoenfeld, B. J., de Salles, B. F., & Cyrino, E. S. (2021). What influence does resistance exercise order have on muscular strength gains and muscle hypertrophy? A systematic review and meta-analysis. European journal of sport science, 21(2), 149–157. https://doi.org/10.1080/17461391.2020.1733672
- Speirs, Derrick E.1,2; Bennett, Mark A.3; Finn, Charlotte V.4; Turner, Anthony P.2. Unilateral vs. Bilateral Squat Training for Strength, Sprints, and Agility in Academy Rugby Players. Journal of Strength and Conditioning Research 30(2):p 386-392, February 2016. | DOI: 10.1519/JSC.0000000000001096
- Lawrence, M. A., Somma, M. J., & Swanson, B. T. (2022). Effect of Load on Muscle Activity, Kinematics, and Force Production During the Reverse Hyperextension Exercise. Journal of applied biomechanics, 38(5), 336–345. https://doi.org/10.1123/jab.2022-0046
Featured Image: Viewfoto studio / Shutterstock
The post 8 Hip Thrust Alternatives to Build Your Glutes and Hamstrings appeared first on Breaking Muscle.


